To record a voiceover over your screen, you need the screen captured and your voice on a microphone at the same moment, mixed into one file that plays back in sync. In Google Chrome on a Mac, Windows or Linux computer, Cheap Recorder does that in a browser tab with nothing to install, writing one MP4 to a folder on your own computer, with a live transcript of what you said. Most of what makes a voiceover sound good is decided before you press Start recording: what you share, which microphone you use, and how you plan what you will say.
What a voiceover on a screen recording is
Wikipedia's page on voice-over describes it as a production technique in which a voice gives narration from outside the action on screen, often read from a script. It notes that synchronous narration, where the voice describes what is happening at the same time, is the most common kind, and that a voice-over is usually recorded first and placed over the top of a film or video, as in documentaries and news reports.
A screen recording with your voice on it is the same idea at a smaller scale. Wikipedia's screencast page defines a screencast as a digital recording of a computer screen, also called a video screen capture or screen recording, that often contains audio narration. The picture shows the clicks; the voice says why each click matters. Without the voice, a viewer sees a cursor moving and has to guess the reasons.
Narrating live or adding the voice later
There are two ways to put a voice over a screen. The first is to talk while you work: you click through the steps and describe them as you go, so the picture and the voice are captured together and are in sync from the start. This is the quickest route for walkthroughs, bug reports, feedback videos and short lessons, and it is what a browser recorder does directly.
The second is to record the screen first, silently, and narrate over the finished clip afterwards. This gives you time to write a tighter script and to redo the voice without redoing the clicks. You can still do it in Chrome: open the silent clip in a Chrome tab, share that tab, and talk over it while it plays. If the clip has its own sound and you want to keep it, share the tab's audio too, and it is mixed into the new recording with your microphone.
For most people, the live take is the better place to start. It is one pass instead of two, and a small stumble in your voice usually matters less than you fear.
How to record a voiceover over your screen in Chrome
The steps are the same whether you narrate live or over a clip. The difference lies in what you share.
- Choose the folder. Under Where to save, press Choose folder… and allow Chrome to edit files in it. Type a name in Name this recording; each recording gets its own folder named with that name, the date and the time it began.
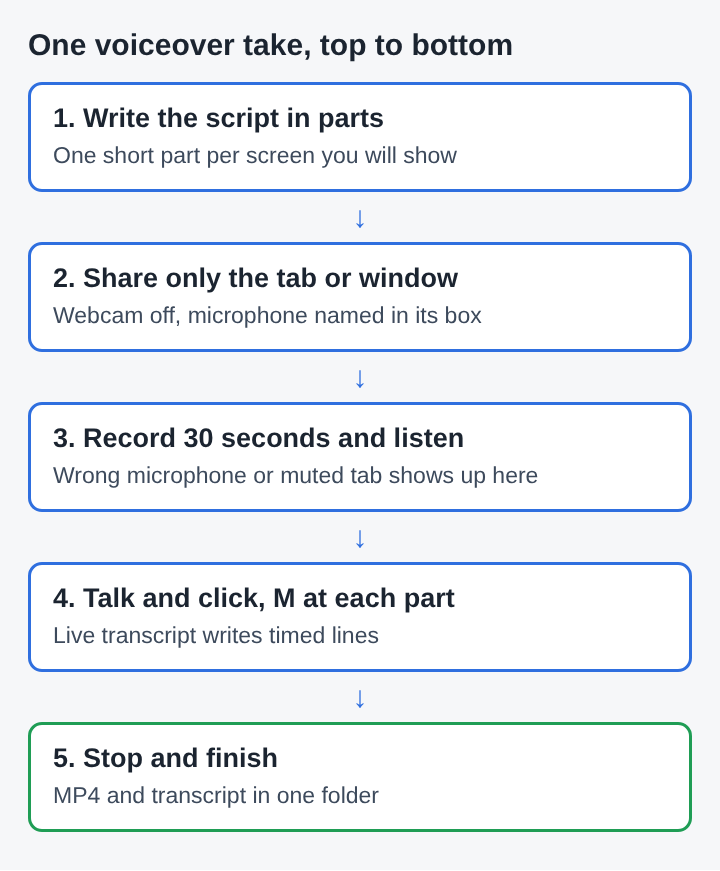
- Share as little as you need. Under What to capture, choose A browser tab or A window rather than Whole screen. Sharing one tab or window keeps notifications, other tabs and private things out of shot.
- Turn the webcam off. A switch turns the webcam on or off. A voiceover is the voice over the picture, so leave the camera off unless you want your face in a corner.
- Check the microphone. The Microphone box names the microphone it found. If it is the wrong one, use Change or add microphones, and Rescan picks up one plugged in late.
- Set the live transcript. Live transcript sits under Options and is ticked by default. Pick the language you will speak before you start, because it is set when the recording begins.
- Record a short trial. Thirty seconds of talking, then Stop and finish, then listen. A wrong microphone or a muted tab shows up here, not ten minutes into the real take.
Getting a clean voice on the microphone
The microphone matters more than the picture. A wired or USB microphone is the safe choice. On a Mac, a Bluetooth headset used as a microphone is switched into a low-quality mode, so keep a Bluetooth headset for listening and use a wired or USB microphone for your voice.
While you record, a level bar next to the microphone moves with its sound. Watch it during the trial: if it barely moves, move closer or pick another microphone; if it hits the top on every word, move back a little. Speak at the distance you will keep for the whole take, since a voice that drifts closer and further away sounds uneven.
A plan helps more than a perfect room. Write the script in short parts, one for each screen you will show, and keep each part to a few sentences. You will not read it word for word while clicking, but it stops the long pauses where you look for the next button and the next thing to say.
A worked example: a four-minute spreadsheet walkthrough
Say you need to show a colleague how a shared budget sheet works. The sheet is open in one Chrome tab, and your script has four parts: what the sheet is for, the income tab, the expenses tab, and the summary chart.
- You choose your Videos folder, name the recording Budget walkthrough 01, choose A browser tab, and pick the budget sheet's tab.
- The webcam is off. The Microphone box shows your USB microphone. Live transcript is ticked, with English (UK) chosen.
- You record thirty seconds reading the first part of the script, stop, and play it back. Your voice is clear and the level bar moved on every sentence, so you go again for real.
- You talk through the four parts while clicking, and press M at the start of each one. A short note confirms the time of every marker.
- After about four minutes you press Stop and finish. The recording appears on the page with a player.
The folder now holds a folder named Budget walkthrough 01 followed by the date and time, and inside it Budget walkthrough 01.mp4 and Budget walkthrough 01 - transcript.txt, with the time of each line you spoke. Your colleague gets one video with your voice over the sheet, and a text they can search for the word "expenses" to jump to that part. If you want the markers saved as files, a markers list and a chapters file, tick Also save every source separately before you start; without it, the notes show while recording but are not saved.
What the folder holds, and editing the voice on its own
The recording is written to the folder about once a second, so a long take does not fill the computer's memory, and the top bar shows a timer and the megabytes written so far. The files are ordinary files: you can move them, rename them or open them in a video editor.
If you plan to edit the voice separately from the picture, for example to cut a cough or raise the volume, tick Also save every source separately under Options before the take starts. Each microphone is then saved as an audio file of its own, named after it and starting with audio_, in a Separate sources folder inside the recording's folder. In that case the recording's card has no download or convert buttons; running bash finalise.sh in the Separate sources folder, with ffmpeg installed, turns each microphone's file into a WAV.
For captions, Captions .srt on the recording's card downloads the timed lines as an SRT file. The captions you see on the preview are not drawn into the video, so the MP4 stays clean, and you add the SRT file where the video is published, after fixing any word the recognition got wrong. Keep in mind that while the live transcript is on, Chrome sends the microphone audio to Google to turn it into text; unticking it before Start recording keeps your voice on the computer.
Frequently asked questions
Can you record a voiceover without showing your face?
Yes. Turn the webcam switch off and share only a tab, a window or the whole screen. The file then has the screen and your voice, with no camera.
Can you add a voiceover to a video recorded earlier?
Yes. Open the video in a Chrome tab, share that tab and talk over it while it plays. Share the tab's audio too if you want to keep the clip's own sound under your voice.
Why does a voiceover sound thin or muffled?
Often it is a Bluetooth headset used as a microphone, which a Mac switches into a low-quality mode. A wired or USB microphone usually fixes it.
Do you need a script for a screen voiceover?
Not word for word, but a short plan with one part per screen helps. It cuts the long pauses where you look for the next step.
Why narration makes a screen recording easier to follow
A screen recording shows what happened; narration says why. The cursor moves to a menu, and your voice says what the menu is for and what to watch for next. That pairing is what turns a silent clip into something a viewer can learn from in one viewing.
The narration does not need to be polished. It needs to be clear, in step with the picture, and recorded on a microphone that carries the voice well. Plan the parts, share only what the viewer needs to see, do a thirty-second trial, and then talk through the screen at an even pace. A timed transcript of that voice is a bonus: the spoken walkthrough becomes a written one, and a viewer who only needs one step can find it in seconds.
Cheap Recorder
Screen recording that is cheap and easy. Visit cheaprecorder.com